Many people quite rightly get anxious about the idea of drilling a hole in a tile. Tiles are very dense, but also have very little tensile strength. Therefore, mistakes in drilling through them will cause cracking, and this is a costly mistake.
The key here is preparation. Knowing the tile, the appropriate drill bits, how to create tension to avoid the drill bit slipping, and how to do the actual drilling, are important to know to prevent cracking. We will explore all of these topics in this handy step by step guide which caters all beginners.
Step 1: Know Your Tiles and Substrate Materials
Starting to drill without knowing the kind of tile and the material beneath them is definitely a bad idea. You need different tools and techniques to cater to different materials.
Tiles
The main types of commonly used tiles are porcelain, ceramic, glass, and natural stone. Ceramic and porcelain tiles look pretty similar, as they are made of the same materials. However, porcelain tiles are fired at a higher temperature, which modifies their chemistry to make them more durable than ceramic ones.
People often find it confusing to tell the difference between them. See the Frequently Asked Questions on how to distinguish between a ceramic and porcelain tile.
Glass tiles are often used in bathrooms. The key for these is to use a drill bit that is harder than the glass itself.
Granite, marble, limestone, and travertine are a few examples of natural stone tiles. They are very durable and require a lot of effort to drill through. You can check various types of tiles to help you identify yours on this page from RealSimple.
Substrate Material
After drilling through the tile, you will reach the substrate, which will be made of a different material. Again, you need to make sure you have the appropriate drill for what comes in this next step.
You may reach concrete, stone, brick, wood, or cement board. Most external walls are made of bricks or concrete, while internal walls are often made of wood and drywall. Cement boards are usually found on bathroom walls.
Step 2: Find the Appropriate Drill Bit
You can use whichever electric drill you have at home. Using the right drill bit is the most essential element in successfully drilling through tiles without cracking them. Tiles are designed to withstand tough conditions. Therefore regular and masonry drill bits, which we commonly use to drill through wood or other soft materials, will not be appropriate.
Even if you are tempted to use a standard masonry bit that you may already have, resist the temptation and buy a tile-specific bit. They’re very cheap and will save you a lot of hassle. There are two main types of specialist drills appropriate for tiles.
Carbide-tipped masonry drill bits are commonly used for tiles, as they are designed to break very hard surfaces. They are appropriate for drilling through ceramic (both glazed and unglazed) tiles.
Diamond-tipped drill bits are even stronger, and they are more appropriate for drilling through must denser materials like porcelain, glass, or natural stone. They are more expensive; however, they do not burn out as quickly as other drill types. They also create a clean and smooth product.
When choosing a drill bit for tiles, remember that the newer, the better. An old drill bit may easily lead to tile damage. Save the old drill bits for less tough materials.
You may still need a regular masonry drill bit to continue when you have reached the wall. These are best for brick or concrete walls. A wood drill bit is appropriate if the substrate material is timber or of wooden origin. You can use a standard drill bit on cement boards.
Step 3: Mark and Prepare the Area
Keeping the drill bit steady when you start is tricky on those glossy or glazed tiles. The trick to stopping the drill bit from moving on the tile’s smooth surface is to create some friction using masking tape. The masking tape also helps reduce chipping that can happen while drilling.
Measure where you want to drill and create an X with masking tape at that point. Then measure again and draw an X with a pen or pencil over the masking tape. An expert’s advice is that to prevent the drill from sliding at the start, you can use a large nail and very gently hammer it where you want to drill, above the tape. You only need to create a small sunken area where you can place the drill bit. A spring-loaded center punch also works perfectly to do the same thing.
Some drills come with drill guides, which are accessories that increase the accuracy when drilling through glazed, smooth materials, such as tiles. These are attached to the wall, and you can then drill through them. They are very helpful, especially for beginners.
Put a sheet down to protect your floor and to help you clean the area afterward. This is also the point when you would want to wear any protective equipment, such as latex grip gloves, earmuffs, a dust mask, and safety goggles. Make sure you are not wearing any loose clothes or accessories that can be caught in the drill.
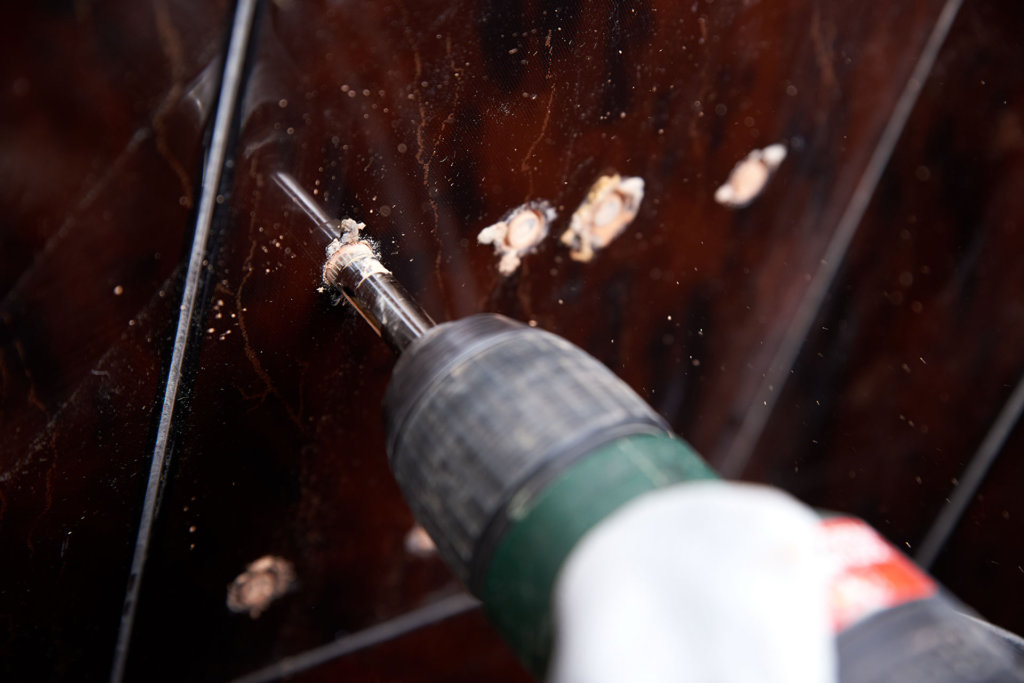
Step 4: Start Drilling
Now you have your drill in your hands ready to go. You may notice that the drill has several modes. Set it to the normal drill mode, avoiding the hammer drill mode while drilling tiles. The reason for this is that vibrations coming from the hammer drill mode may cause the tile to break or fall off, in case there is a void behind the tile or bad mortar mix.
Start by applying steady firm pressure. If you’ve done all the prep work above, and you drill slowly, there is no reason why you should have any cracks. It is tempting to increase pressure once you are drilling. Be patient, and do not apply too much pressure. Let the drill do the work for you.
Keep the speed low, especially if you’re a beginner. There are some charts online which have information regarding the speed recommended for different materials.
Keeping the Drill Bit Cool
A critical step is to keep the tip of the bit cool and lubricated while drilling. Carbide tipped drill bits stop working once they are overheated. An easy way to keep the bit cool is to keep a bowl of cold water by your side, in which you can insert the tip of the drill bit after drilling for around 4 to 5 seconds. Alternatively, you can use a wet sponge to cool down the drill bit.
If you are seriously thinking about more DIY projects, you can buy some fancy integrated bit cooling accessories or fresh cutting oil. They will also extend the tile of your drill bits.
Step 5: Once You Hit the Wall
Continue to drill slowly and stop once you hit the wall. Continuing to drill at high speed at this point may cause problems as you may damage the wall and the drill bit.
You may wish to change the drill bit to one appropriate for the wall composition. Usually, standard, multi-material drill bits work well for this part. However, if you only have the tile bit, you can normally continue to use it for the wall, provided you drill slowly and steadily.
Bonus Tip: How to Safely Attach the Fixture
Now that you have successfully drilled through, you might think that the tile is safe. In fact, it is not, as many people make a common mistake when trying to attach the fixture.
You need to insert a plug into the newly opened hole. Always use a plug that matches the size of the hole you just made. Forcing a bigger plug, or one that has a slightly conical shape will create a lot of tension and may result in a crack in the tile.
Frequently Asked Questions
How can I tell the difference between ceramic and porcelain tiles?
Porcelain tiles are stronger than ceramic ones. They have a smooth finish, while ceramic tiles have a slightly rough finish. Ceramic tiles are often glazed, and in that case, if you have a loose tile, just look at the other side of the tile, which is unglazed.
Porcelain tiles have a consistent color thought out all their body. In contrast, ceramic tiles have a different color: often white, tan, or red, underneath the glazed surface. Ceramic tiles are also easier to stain or chip than porcelain ones.
How do I drill glazed tiles?
Most ceramic tiles are coated with a thin layer of silica, which, when baked, turns into a thin glass-like coating. This shiny glaze makes the surface slippery and challenging to start drilling into.
Regardless of whether the tile is glazed or unglazed, you should still use the drill bit appropriate for the tile, i.e., diamond for porcelain and carbide for ceramic. Once the drill bit penetrates through the glazed coat, it will drill more rapidly through ceramic tiles, as their clay core is softer than the glaze’s silica.